Go Back   EcoModder Forum > EcoModding > Aerodynamics
Register Now
 Register Now
 

Reply  Post New Thread
 
Submit Tools LinkBack Thread Tools
Old 04-29-2010, 06:59 PM   This thread is in the EcoModder Project Library | #1 (permalink)
Aero Apprentice
 
swede's Avatar
 
Join Date: Aug 2009
Location: Winnipeg, Canada
Posts: 59
Thanks: 4
Thanked 6 Times in 4 Posts
Swede's AeroLid build thread

Following in the footsteps of others here I have decided to build an aerodynamic cover for my 2009 GMC Sierra. The truck has a 4.8L engine, automatic transmission and 4wd. Current HWY average is 20-21 mpg US.

Highway cruising speed is consistently 105 km/h and terrain is varied on my weekly round trip that totals 550km. This is a 225km one way trip from my hometown to work.

The idea for the aerolid is following along design that Bajascoob used. I bought 100' of 1/2" tubing for $29.00 CAD and will try using some leftover 6mil vapour barrier plastic that I have.

Total costs so far:
1/2" EMT $29
1/2" EMT bender $50 (Gotta have the right tools )
Angle indicator $22

The basic layout will be similar to Bajascoob's unless there have been any inherent faults with that design so far. A basic tapering down and in towards the tailgate will offer a rudimentary "boat tail" to the lid. I plan to have it hinge up at the front like a solid tonneau if a good strong design comes together.

So far it looks like I'll have a 12 degree slope from cab to tailgate. I'll have to hump it a little just after the cab to prevent a sharp angle change and cause airflow separation. Here are some pics of what I've started with.

Attached Thumbnails
Click image for larger version

Name:	IMG00120-20100429-1721 [50%] [50%].jpg
Views:	1776
Size:	50.3 KB
ID:	5988   Click image for larger version

Name:	IMG00122-20100429-1722 [50%] [50%].jpg
Views:	1793
Size:	49.4 KB
ID:	5989   Click image for larger version

Name:	IMG00123-20100429-1722 [50%] [50%].jpg
Views:	1811
Size:	48.6 KB
ID:	5990   Click image for larger version

Name:	IMG00121-20100429-1721 [50%] [50%].jpg
Views:	1820
Size:	36.2 KB
ID:	5991  
__________________
1994 electricfly EV conversion 36V/450A/60km/h
1997 Suzuki Sprint hatch (parts car?)
1998 Geo Metro sedan 1.3L auto (the wifes)
2009 GMC Sierra 27us/mpg best yet (still workin on it)
  Reply With Quote
Alt Today
Popular topics

Other popular topics in this forum...

   
Old 04-30-2010, 07:05 AM   #2 (permalink)
EcoModding Apprentice
 
Join Date: Nov 2009
Location: Michigan
Posts: 111
Thanks: 10
Thanked 20 Times in 13 Posts
Looks like a good start. Do you think it would create too much turbulence if you lower the front top edge enough to allow those behind you to see your third break light? Or will it be visible through the plastic? Or could it be relocated to the top center of the tailgate?

I've seen so many cases where one break light has burnt out and when the driver pumps the brakes it looks like a turn signal. I really appreciate the third light.
  Reply With Quote
Old 05-01-2010, 01:31 AM   #3 (permalink)
Aero Apprentice
 
swede's Avatar
 
Join Date: Aug 2009
Location: Winnipeg, Canada
Posts: 59
Thanks: 4
Thanked 6 Times in 4 Posts
Plans are to have a third light on the rear deck lid of the cap. There will be more pics of construction as the weekend progresses.

Initial tests of 6 mil plastic were disappointing, less shrink than expected but good self welding characteristics. Too bad.

I'm now looking at clear coroplast or lexan. I may have a hook up for a skid (pallet) of lexan and umhw plastic cut off's from a family hookup, (brother in law).

If this works out I am hoping for a Lexan shell. If I cant get the plastic soon enough I will go to Home Depot and get white or clear coroplast for the test run.
__________________
1994 electricfly EV conversion 36V/450A/60km/h
1997 Suzuki Sprint hatch (parts car?)
1998 Geo Metro sedan 1.3L auto (the wifes)
2009 GMC Sierra 27us/mpg best yet (still workin on it)
  Reply With Quote
Old 05-01-2010, 09:30 PM   #4 (permalink)
Aero Apprentice
 
swede's Avatar
 
Join Date: Aug 2009
Location: Winnipeg, Canada
Posts: 59
Thanks: 4
Thanked 6 Times in 4 Posts
Continued

Pictures of the framework construction. All joints are welded, no connectors used.


Attached Thumbnails
Click image for larger version

Name:	IMG00126-20100501-1149 [50%] [50%].jpg
Views:	1772
Size:	42.7 KB
ID:	5995   Click image for larger version

Name:	IMG00127-20100501-1149 [50%] [50%].jpg
Views:	1720
Size:	46.2 KB
ID:	5996   Click image for larger version

Name:	IMG00128-20100501-1150 [50%] [50%].jpg
Views:	1727
Size:	49.9 KB
ID:	5997   Click image for larger version

Name:	IMG00129-20100501-1252 [50%] [50%].jpg
Views:	1739
Size:	44.8 KB
ID:	5998   Click image for larger version

Name:	IMG00130-20100501-1252 [50%] [50%].jpg
Views:	1761
Size:	43.9 KB
ID:	5999  

Click image for larger version

Name:	IMG00131-20100501-1252 [50%] [50%].jpg
Views:	1715
Size:	41.6 KB
ID:	6000  
__________________
1994 electricfly EV conversion 36V/450A/60km/h
1997 Suzuki Sprint hatch (parts car?)
1998 Geo Metro sedan 1.3L auto (the wifes)
2009 GMC Sierra 27us/mpg best yet (still workin on it)
  Reply With Quote
Old 05-01-2010, 09:53 PM   #5 (permalink)
Aero Apprentice
 
swede's Avatar
 
Join Date: Aug 2009
Location: Winnipeg, Canada
Posts: 59
Thanks: 4
Thanked 6 Times in 4 Posts
Sourced some black coroplast for 30 dollars for 2 4x8 sheets. Covered the frame with it and riveted it on. The rivets tended to pull out of the plastic a little too easy so I made washers out perforated strapping and uses the strapping to edge the major stress areas around the corner bends. 1/8" pop rivets are used to fasten the entire perimeter of the covering.

More pics.....

Interior view showing framework. Pipe insulation keeps the box rails from getting beat up.


Exterior showing coroplast. My first time working with it. I found that a heat gun and carefully bending the radius of the corners prevented major kinks.


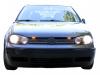
A few pics of the back showing the fastback style raised edge. This was done in an attemt to "boat tail" air flow. Some bubbling issues with the plastic on the sides. I may add additional braces and fasten it on the sides.


Here it is on the truck. There are four stakes that drop into the trucks stake pockets. Ratchet straps fasten it down into the the bed from the cargo tiedowns in the box.


If it works well I will design a hinge from the front to allow it to raise up like a solid tonneau cover.
I will be very closely monitoring fuel consumption for the next while and will post results here as I get them. Barring no major headwinds, typical fuel consumption ranges from 19-21mpg hwy most times.

Total cost to date for supplies (not including tools) $70.00 tax included.
Comments and suggestions welcome!!

Thanks

Swede
Attached Thumbnails
Click image for larger version

Name:	IMG00132-20100501-1707 [50%] [50%].jpg
Views:	1750
Size:	50.7 KB
ID:	6001   Click image for larger version

Name:	IMG00133-20100501-1707 [50%] [50%].jpg
Views:	1754
Size:	37.8 KB
ID:	6002   Click image for larger version

Name:	IMG00134-20100501-1707 [50%] [50%].jpg
Views:	1719
Size:	46.6 KB
ID:	6003   Click image for larger version

Name:	IMG00135-20100501-1707 [50%] [50%].jpg
Views:	1772
Size:	49.6 KB
ID:	6004   Click image for larger version

Name:	IMG00136-20100501-1715 [50%] [50%].jpg
Views:	42667
Size:	52.9 KB
ID:	6005  

Click image for larger version

Name:	IMG00137-20100501-1800 [50%] [50%].jpg
Views:	1750
Size:	57.1 KB
ID:	6006  
__________________
1994 electricfly EV conversion 36V/450A/60km/h
1997 Suzuki Sprint hatch (parts car?)
1998 Geo Metro sedan 1.3L auto (the wifes)
2009 GMC Sierra 27us/mpg best yet (still workin on it)

Last edited by swede; 05-01-2010 at 10:00 PM..
  Reply With Quote
Old 05-03-2010, 06:00 PM   #6 (permalink)
Aero Wannabe
 
COcyclist's Avatar
 
Join Date: Dec 2007
Location: NW Colo
Posts: 738

TDi - '04 VW Golf
TEAM VW AUDI Group
90 day: 53.2 mpg (US)
Thanks: 705
Thanked 218 Times in 169 Posts
Looks great. Nice work, I hope you see some positive results. For anyone welding EMT, be sure to wire brush off the galvanized coating and/or weld in a ventilated area.

Do you have a rough estimate of the weight of the AeroLid?
__________________
60 mpg hwy highest, 50+mpg lifetime
TDi=fast frugal fun
https://ecomodder.com/forum/showthre...tml#post621801


Quote:
Originally Posted by freebeard View Post
The power needed to push an object through a fluid increases as the cube of the velocity. Mechanical friction increases as the square, so increasing speed requires progressively more power.
  Reply With Quote
Old 05-03-2010, 06:12 PM   #7 (permalink)
Aero Apprentice
 
swede's Avatar
 
Join Date: Aug 2009
Location: Winnipeg, Canada
Posts: 59
Thanks: 4
Thanked 6 Times in 4 Posts
Quote:
Looks great. Nice work, I hope you see some positive results. For anyone welding EMT, be sure to wire brush off the galvanized coating and/or weld in a ventilated area.

Do you have a rough estimate of the weight of the AeroLid?
Welding galvanized steel is not something to be undertaken by someone who is not aware of the dangers of zinc poisoning. When I welded the skeleton together I was in a garage with a good crossbreeze and I didn't hover in the path of the welding smoke, rather staying back a bit and letting the smoke get blown away.

The AeroLid wieghs in at less than 30 lbs, probably around 20lb. I havent weighed it yet but I can lift it up with one hand and mount it on the truck easily myself (two hands).
__________________
1994 electricfly EV conversion 36V/450A/60km/h
1997 Suzuki Sprint hatch (parts car?)
1998 Geo Metro sedan 1.3L auto (the wifes)
2009 GMC Sierra 27us/mpg best yet (still workin on it)
  Reply With Quote
Old 05-03-2010, 09:50 PM   #8 (permalink)
Master EcoModder
 
Join Date: Apr 2010
Location: belgium, wi
Posts: 262

Bus - '94 Ford School Bus huge

Stupid - '01 Chevy Blazer LS
90 day: 21.38 mpg (US)

hawk - '00 Honda Superhawk
Thanks: 2
Thanked 24 Times in 19 Posts
it is probably a good suggestion to use a respirator or exhaust system. If you avoid contact with the smoke, its reasonable, but precautions never hurt anyone. By the way, I teach high school shop.
  Reply With Quote
Old 05-03-2010, 10:56 PM   #9 (permalink)
Master EcoModder
 
vskid3's Avatar
 
Join Date: Jun 2008
Location: Utah
Posts: 975

Civic DX (sold) - '97 Honda Civic DX
90 day: 34.15 mpg (US)

GTO (sold) - '04 Pontiac GTO
90 day: 22.62 mpg (US)

Green Brick (sold) - '06 Ford Escape Hybrid
90 day: 31.93 mpg (US)
Thanks: 193
Thanked 312 Times in 221 Posts
Nice job. How do you plan on making it hinged? I was thinking it would be best to have the hinge at the top with a frame to support it while it's up.
I wonder if there is any difference in gains between a longbed and shortbed with a cover like this.
  Reply With Quote
Old 05-04-2010, 12:26 AM   #10 (permalink)
Aero Apprentice
 
swede's Avatar
 
Join Date: Aug 2009
Location: Winnipeg, Canada
Posts: 59
Thanks: 4
Thanked 6 Times in 4 Posts
Quote:
I was thinking it would be best to have the hinge at the top with a frame to support it while it's up.
That's exactly what I had in mind. I plan on making a "headache rack" type frame with hinges at the top and gas struts to support the lid while it is up. The only challenge will be figuring out how to prevent the bottom front edge from hitting the box rails due to the lower swept arc as the lid opens. I'll have to think up some fancy hinge geometry for that I guess.

__________________
1994 electricfly EV conversion 36V/450A/60km/h
1997 Suzuki Sprint hatch (parts car?)
1998 Geo Metro sedan 1.3L auto (the wifes)
2009 GMC Sierra 27us/mpg best yet (still workin on it)
  Reply With Quote
Reply  Post New Thread


Thread Tools


Similar Threads
Thread Thread Starter Forum Replies Last Post
Ben Nelson's Electro-Metro Build thread bennelson Fossil Fuel Free 1499 12-22-2019 07:24 PM
Build Thread: 1996 Ranger 2.3L 5spd 2WD XVTer EcoModding Central 18 05-27-2012 08:39 PM
The Little Red Build Thread Oval_Overload EcoModding Central 37 09-30-2010 06:19 PM
Build Thread Key Postings Index Experiment. TestDrive Forum News & Feedback 7 02-15-2009 08:53 PM
The UnNamed Wagon's build thread - Let it begin! Work in Progress XFi EcoModding Central 38 08-01-2008 12:21 AM


Powered by vBulletin® Version 3.8.11
Copyright ©2000 - 2024, vBulletin Solutions Inc.
Search Engine Friendly URLs by vBSEO 3.5.2
All content copyright EcoModder.com